Easter Bread Tradition: Celebrating with Classic Festive Recipes
There is something truly magical about the scent of yeast and sugar filling my home during the spring holidays. I still remember watching my grandmother knead dough with such care, creating a centerpiece that brought our entire family together. This easter bread tradition remains my favorite way to honor those memories while making new ones with my own children.
Thank you for reading this post, don't forget to subscribe!Baking a soft, fluffy loaf is more than just a recipe; it is an act of love. The golden, sweetened dough offers a beautiful texture that looks stunning on any brunch table. If you are looking for the perfect bread for easter, this guide will help you master the process with ease.
You will find that incorporating these festive elements into your kitchen routine is both rewarding and simple. Let us create something delicious that your guests will talk about for years to come.
Table of Contents
The Rich History of the Easter Bread Tradition
The story of our favorite holiday breads is as rich and layered as the dough itself. For generations, families have gathered in the kitchen to prepare a traditional easter bread that marks the end of the Lenten season. I believe that knowing the origins of these recipes transforms a simple baking task into a meaningful connection with our ancestors.

Delving into easter bread history reveals how these loaves evolved from humble sustenance into elaborate festive centerpieces. These breads were not just food; they were symbols of hope, renewal, and the joy of spring. Every region developed its own unique twist, yet the core purpose of celebrating life remained constant across borders.
Symbolism Behind the Bread
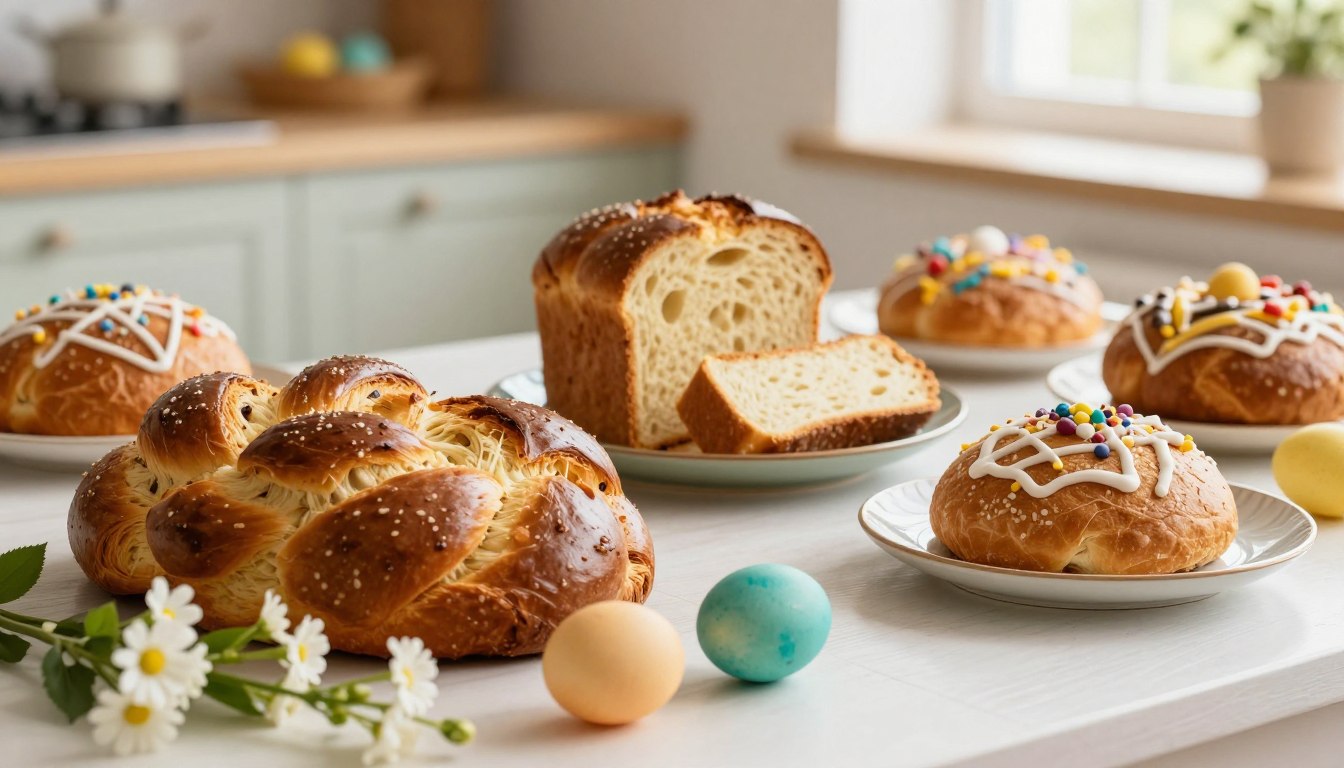
When I look at the intricate shapes of these loaves, I see more than just flour and water. The braided patterns often represent the trinity or the binding of community ties, while the circular wreath shape symbolizes the crown of thorns or the cycle of eternal life.
Many recipes also incorporate whole eggs, which are tucked into the dough before baking. These eggs serve as a powerful symbol of rebirth and fertility. Seeing the vibrant colors of dyed eggs nestled in a golden, crusty loaf is truly a highlight of my holiday table.
Cultural Roots Across Europe and the United States
The roots of these customs run deep in Italian and Greek households, where baking is a sacred ritual. In Italy, the dove-shaped Colomba di Pasqua is a beloved staple, while Greek families take pride in their aromatic, spice-filled loaves. These traditions traveled across the ocean as immigrants settled in the United States, bringing their cherished recipes to new kitchens.
Today, these practices have blended into a beautiful tapestry of American holiday culture. I love how we continue to honor our heritage by sharing these loaves with friends and neighbors. Whether you follow an old family recipe or try a new variation, you are participating in a timeless celebration that connects us all.
Essential Ingredients for Authentic Homemade Easter Bread
I believe that the secret to a delicious sweet bread recipe lies in the quality of your ingredients. When you prepare a homemade easter bread, every component plays a vital role in the final texture and taste. By gathering these items before you start, you ensure a smooth and enjoyable baking process.
Selecting High-Quality Flour and Yeast
The foundation of any great loaf is the flour you choose. I recommend using high-protein bread flour, as it provides the necessary structure for a light and airy crumb. Always check your yeast expiration date to ensure your dough rises properly.
If you are using active dry yeast, remember to proof it in warm water first. This simple step confirms that your yeast is alive and ready to work. Using fresh, high-quality yeast is the best way to guarantee a successful bake.
The Importance of Fresh Dairy and Eggs
Richness is a hallmark of a traditional holiday loaf. I always use full-fat milk and farm-fresh eggs to create a tender, golden interior. These ingredients provide the fat needed to keep your bread soft for several days.
Make sure your dairy and eggs are at room temperature before you begin mixing. This helps the ingredients emulsify, resulting in a more consistent dough. Proper temperature control is a small detail that makes a massive difference in your final result.
Flavor Enhancers: Citrus Zest, Spices, and Dried Fruits
Customizing your sweet bread recipe is the most exciting part of the process. I love adding freshly grated orange or lemon zest to brighten the flavor profile. You can also incorporate warm spices like cardamom or cinnamon for a traditional touch.
Dried fruits, such as raisins or currants, add a lovely sweetness and texture to every bite. Feel free to experiment with different combinations to make your homemade easter bread truly unique. The following table outlines how these key ingredients contribute to your success:
| Ingredient | Primary Role | Pro Tip |
|---|---|---|
| Bread Flour | Structure | Sift for lighter texture |
| Whole Milk | Richness | Warm to 110°F |
| Large Eggs | Binding | Use at room temperature |
| Citrus Zest | Aroma | Use organic fruit |
Preparing Your Kitchen and Workspace for Baking
I find that the secret to perfect dough lies in how I prepare my kitchen before I even touch the flour. Taking these small steps to organize your workspace will make the entire easter bread baking process much more enjoyable and professional. A clear, clean counter is the foundation of every great loaf.
Gathering Necessary Tools and Equipment
Before you start, I recommend laying out all your tools to avoid scrambling mid-recipe. Having everything within reach ensures that your workflow remains steady and efficient.
Here are the essential items I keep on my counter when baking easter bread:
- Large mixing bowl: Choose one with enough room for the dough to double in size.
- Sturdy bench scraper: This is vital for handling sticky dough without making a mess.
- Digital kitchen scale: Precision is key for consistent results in yeast-based recipes.
- Clean kitchen towels: Use these to cover your dough during the proofing stages.
Creating the Ideal Temperature for Dough Development
Yeast is a living organism that thrives in specific conditions. If your kitchen is too cold, your dough will struggle to rise, leading to a dense and heavy final product.
“The environment in which you proof your dough is just as critical as the quality of your yeast. Warmth is the catalyst for life in every loaf.”
I often create a “proofing box” by placing my bowl inside a turned-off oven with a pan of hot water on the rack below. This simple trick provides the consistent, gentle heat needed for the dough to expand properly. Always aim for a draft-free spot to ensure your baking easter bread project reaches its full potential.
Step-by-Step Guide to Mixing and Kneading the Dough
Mixing and kneading are the heart of any great sweet bread recipe. While the process might seem intimidating at first, I find it to be the most therapeutic part of the entire baking journey. By following these precise steps, you will transform basic pantry staples into a soft, supple dough ready for the oven.
Activating the Yeast Properly
The secret to a perfect rise begins with blooming your yeast. I always ensure my liquid—usually warm milk or water—is between 105°F and 115°F. If the liquid is too hot, it will kill the yeast, but if it is too cold, the yeast will remain dormant.
Simply whisk a pinch of sugar into the warm liquid and sprinkle your yeast on top. After about five to ten minutes, you should see a foamy, creamy layer forming on the surface. This indicates that your yeast is active and ready to provide the lift your bread needs.
Combining Wet and Dry Ingredients
Once your yeast is ready, it is time to bring the dough together. I prefer to mix my dry ingredients in a large bowl before creating a well in the center for the wet mixture. Slowly incorporate the flour into the liquid to avoid large clumps.
When the dough begins to form a shaggy mass, I start adding my softened butter in small increments. This slow incorporation is vital for achieving that signature brioche-like texture. It might look messy at first, but keep mixing until the butter is fully absorbed into the dough.
Techniques for Achieving the Perfect Dough Elasticity
Kneading is where the magic happens, as it develops the gluten structure necessary for a light crumb. I recommend using the heel of your hand to push the dough away from you, then folding it back over itself. Repeat this motion consistently for about ten minutes until the surface feels smooth and bounces back when poked.
“Baking is a process of patience and precision, where the dough tells you exactly when it is ready to be shaped.”
If you are new to this, do not worry if your hands get a little sticky. You can lightly dust your surface with flour, but try to keep the dough as hydrated as possible for the best results in your sweet bread recipe.
| Dough Stage | Visual Cue | Texture Feel |
|---|---|---|
| Initial Mix | Shaggy and uneven | Sticky and loose |
| Mid-Knead | Becoming cohesive | Tacky but firming |
| Fully Developed | Smooth and shiny | Elastic and springy |
Mastering the First and Second Proofing Stages
Once your dough is mixed, the real magic happens during the proofing stages. Patience is truly the most important ingredient when you are baking easter bread. If you rush this process, your final loaf may end up dense rather than light and airy.
Creating a Draft-Free Environment
Yeast is a living organism that thrives in warm, stable conditions. I always recommend placing your bowl in a spot away from windows or air conditioning vents. A turned-off oven with a bowl of hot water nearby creates the perfect micro-climate for your dough to rise steadily.
Signs That Your Dough Has Doubled in Size
You will know your dough is ready when it has visibly doubled in volume. A simple trick is to gently press two fingers into the surface of the dough. If the indentation remains and the dough does not spring back immediately, it is perfectly proofed and ready for the next step in baking easter bread.
The Importance of Punching Down the Dough
Many beginners feel nervous about punching down the dough, but it is a necessary step. This action releases large air bubbles and redistributes the yeast, which ensures a uniform texture throughout your loaf. It also helps to strengthen the gluten structure, giving your bread a better shape during the final bake.
| Proofing Stage | Ideal Temperature | Primary Goal |
|---|---|---|
| First Rise | 75°F – 80°F | Develop flavor and structure |
| Punch Down | Room Temp | Release excess gas |
| Second Rise | 75°F – 80°F | Final volume expansion |
By following these specific techniques, you ensure that your baking easter bread project results in a professional appearance. Consistent proofing is the hallmark of a skilled baker. Take your time, observe your dough, and enjoy the rewarding process of creating something delicious from scratch.
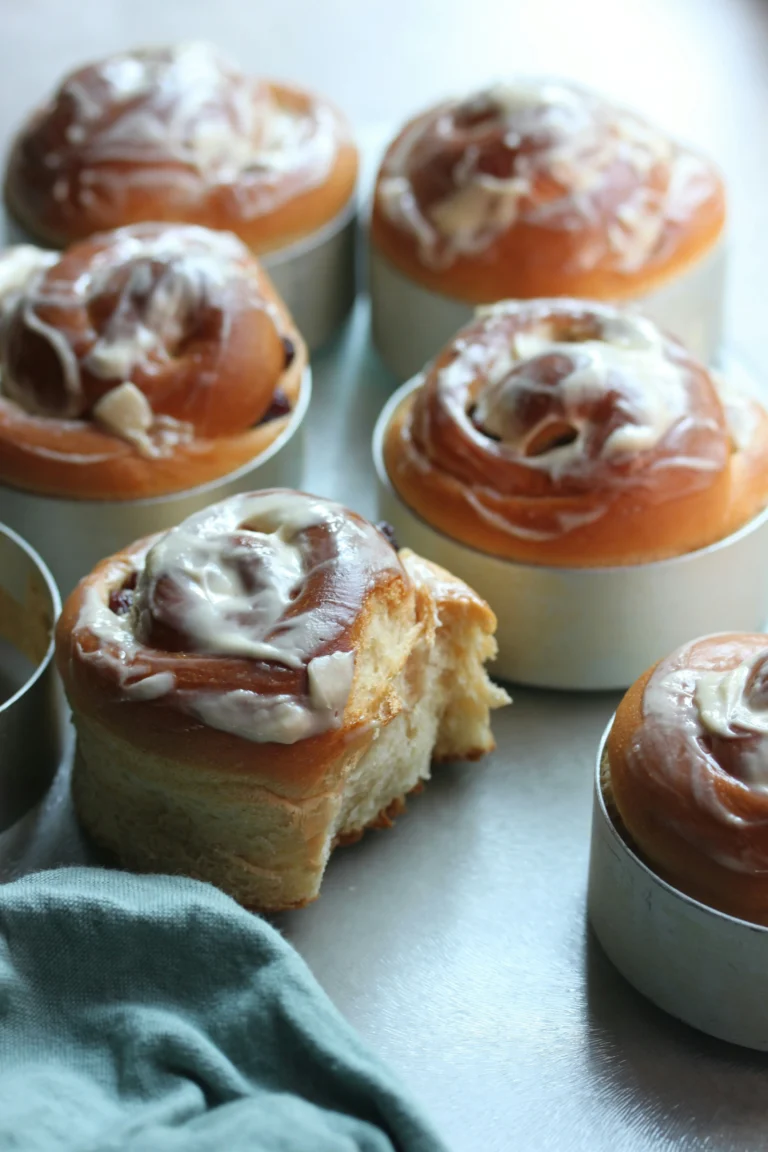
Shaping and Decorating Your Festive Loaves
Bringing your holiday table to life starts with the way you shape your bread for easter. This is the moment where your hard work turns into a stunning centerpiece that captures the spirit of the season. I find that taking my time during this stage ensures the final result looks as incredible as it tastes.
Classic Braided Loaf Techniques
To create a beautiful wreath, I divide my dough into three equal portions and roll them into long, even ropes. I gently pinch the ends together at the top and begin a simple over-under braid, keeping the tension consistent so the loaf holds its shape. Once finished, I tuck the ends underneath to form a perfect circle, creating a professional-looking ring that is ready for the oven.
Incorporating Dyed Eggs into the Design
Adding colorful, dyed eggs is a traditional way to give your bread for easter that iconic, nest-like appearance. I carefully nestle the raw, dyed eggs into the gaps of the braid before the final proofing stage. It is important to ensure the eggs are tucked in securely so they stay in place while the dough expands during the bake.
Applying Egg Washes and Toppings for a Professional Finish
Before sliding the loaf into the oven, I always apply a light egg wash to achieve a gorgeous, golden-brown sheen. I whisk one egg with a splash of water and brush it gently over the surface, being careful not to deflate the dough. To finish, I sprinkle colorful nonpareils or coarse sugar over the top to make my bread for easter truly festive and inviting for my guests.
Baking Techniques for the Perfect Golden Crust
When it comes to easter bread baking, the final stage in the oven is where the magic truly happens. I believe that achieving a professional finish is well within your reach if you monitor the process closely. By focusing on heat management and timing, you can ensure your loaf looks as beautiful as it tastes.
Adjusting Oven Temperatures for Even Baking
I always recommend preheating your oven thoroughly to ensure a consistent environment. If the temperature is too high, the exterior may darken before the center is fully cooked. Lowering the heat slightly after the first fifteen minutes of baking helps the loaf rise evenly without burning the delicate crust.
Using Steam to Enhance Crust Texture
Adding moisture to your oven is a secret trick for a bakery-quality result. You can place a small pan of hot water on the bottom rack during the first few minutes of the bake. This steam helps the dough expand fully and creates a beautifully crisp, golden finish that defines high-quality easter bread baking.
Testing for Doneness with Internal Temperature
Visual cues can be misleading, so I rely on a digital thermometer to check for doneness. Your bread is ready when the internal temperature reaches approximately 190°F to 200°F. This ensures the interior is perfectly soft and any eggs baked into the dough are safely set. Checking the temperature gives me the confidence to pull a perfect loaf out of the oven every single time.
Exploring Global Variations of Traditional Easter Bread
Across the globe, the tradition of baking special breads for the spring season takes on many beautiful forms. I find that exploring these traditional easter bread recipes is a wonderful way to connect with history while filling my home with incredible aromas. Each culture brings its own unique flair to the table, offering a wide range of easter bread variations that are as delicious as they are meaningful.
Italian Colomba di Pasqua
In Italy, the celebration is synonymous with the Colomba di Pasqua. This iconic bread is shaped like a dove, which serves as a symbol of peace and rebirth. I love how the top is finished with a crunchy almond glaze and pearl sugar, providing a perfect contrast to the light, airy dough inside.
Greek Tsoureki and Its Unique Spices
When I look toward Greece, I am always drawn to the aromatic beauty of Tsoureki. This braided loaf is famous for its distinct flavor profile, which comes from two specific spices: mahleb and mastic. These ingredients give the bread an earthy, floral scent that is truly unforgettable.
“The act of baking is a bridge between generations, turning simple flour and water into a shared memory that transcends borders.”
Eastern European Paska Traditions
Eastern European Paska is another stunning example of how culture shapes our baking. This bread is often tall and cylindrical, featuring intricate dough decorations that represent religious symbols. It is a labor of love that highlights the deep connection between the baker and their heritage.
Learning about these global easter bread variations has truly inspired me to experiment with new techniques in my own kitchen. Whether you are braiding dough or crafting a dove shape, there is always something new to discover. Embracing these traditional easter bread styles allows us to celebrate the season with a truly international spirit.
Tips for Storing and Serving Your Homemade Creations
You have put so much effort into your holiday baking, so let’s ensure it stays delicious for days. Proper care after the oven timer dings is the secret to maintaining that perfect texture and flavor. By following a few simple steps, you can extend the life of your homemade easter bread significantly.
Cooling Methods to Prevent Soggy Bottoms
The most common mistake bakers make is leaving the loaf on a flat surface to cool. Steam trapped underneath the bread will condense, leading to a soggy, unappealing bottom crust. Instead, always transfer your bread to a wire cooling rack immediately after removing it from the pan.
This allows air to circulate freely around the entire loaf. If you do not have a rack, use a clean kitchen towel or a trivet to elevate the bread. Patience is key here; wait until the loaf is completely cool before storing it to prevent moisture buildup inside your container.
Best Practices for Freezing and Reheating
If you find yourself with more homemade easter bread than you can eat in a few days, the freezer is your best friend. Wrap the cooled loaf tightly in plastic wrap, followed by a layer of aluminum foil to prevent freezer burn. This method keeps the crumb moist for up to one month.
When you are ready to enjoy it again, follow these simple reheating tips:
- Thaw the bread at room temperature while still wrapped.
- For a fresh-baked feel, warm the loaf in a 350°F oven for about ten minutes.
- Avoid the microwave, as it often makes the bread rubbery or tough.
Creative Ways to Serve Leftover Easter Bread
If your bread has become slightly stale, do not throw it away. Stale homemade easter bread is actually perfect for various culinary transformations. Because these loaves are often rich with eggs and butter, they make an incredible base for breakfast dishes.
Try these delicious ideas to minimize waste:
- French Toast: Soak thick slices in a mixture of eggs, milk, cinnamon, and vanilla before pan-frying until golden.
- Bread Pudding: Cube the leftovers and bake them with a custard base for a decadent dessert.
- Toasted Croutons: Cube the bread, toss with melted butter, and bake until crunchy for a sweet salad topping.
Conclusion
Baking this traditional bread creates lasting memories while you celebrate the season with your loved ones. You have mastered the art of mixing, proofing, and shaping a beautiful, festive loaf through your dedication to the craft.
I hope this guide inspires you to make this delicious tradition a permanent part of your annual holiday celebrations. Your kitchen now serves as a hub for creating meaningful experiences that span generations.
Enjoy sharing your homemade creation with family and friends at your next brunch gathering. Please share photos of your golden loaves on social media and tag your favorite baking brands like King Arthur Baking Company or Bob’s Red Mill to show off your hard work.
I love hearing about the unique twists you bring to these classic recipes. Your passion for baking keeps these timeless customs alive in homes across the United States.